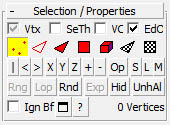
Selection/Properties Rollout
This is the Selection Panel similar to
Edit Mesh's selection panel.
In the top row you see three of the mostly used Object properties directly accessible via the modifier's user interface. These are not really part of the modifier. You can't undo the object properties changes (like in max' properties dialog), and the properties stay on the object, even if you delete the modifier. Nevertheless it seemed a good idea to put them into the modifier user interface, because I needed these properties very often. Additionally, you can switch vertex ticks on or off.
In the next row you see the buttons for the subobject modes. You should be familiar with the subobject modes Vertices, Edges, Faces, Polygons and Elements by Edit Mesh. There are two additional Subobject modes: UVFaces and UVPolys. These deal with the UV coordinates and material IDs of faces and polygons and will be described in their rollout description.
If you click on the subobject buttons with shift, you can load the clicked subobject selection into the current subobject selection. This means, if you are e.g. in vertex subobject mode, and click with shift onto faces, all vertices, which lie on selected faces, will be selected. Additionally, the shift click feature expands to polys or elements, if you click on these subobject buttons.
In the next two rows you see various buttons dealing with subobject selection.
Some of the buttons have a "hidden feature": You can vary the type of selection by max' default selection function keys: "Ctrl" adds the selection to the current selection, "Shift" alters the selection (XOR), and "Alt" removes the selection from the current selection. This works for |,<,>,Open and Rnd.
"Ring" and "Loop" work exactly the same way they work in Editable Poly; the same restrictions appear, and like in Editable Poly, only visible edges can be worked with this.
"X","Y" and "Z" behave a bit strange in edges mode. If you expand a selection perpendicular to an edge (e.g. the edge is parallel to the x axis and you expand to y), the perpendicular edges on the border of the original edge are selected too. This is not a bug, since the perpendicular edges really belong to the selection! They are clearly inside the area to be selected and thus there's no way not to select them. Nevertheless this behaviour might be unwanted. So think about using "Ring" and "Loop" for edges instead, where other restrictions appear ;-)
|,<,>,X,Y and Z currently only work in the local space of the object. It is planned to extend this to the other reference coordinate systems in the future.
Important:
There's a special thing to notice concerning the |,< and > buttons: To select the subobjects left, right and in the center of an object, you first have to exactly define what IS the center. Ok, it's the pivot. But if we just would look if a point has the exactly same x position as the pivot, we would find very few points. Even a newly created object has some inaccuracies in its vertices, which means that the vertices vary in their position. This variation is ridiculously small (4 digits after comma), but it has to be taken into account. So you can set the accuracy yourself in the settings dialog, to tell the program, what you want it to regard as "the center". The default precision is 0.001.
In the last row you find three other buttons and a status display:
In the top row you see three of the mostly used Object properties directly accessible via the modifier's user interface. These are not really part of the modifier. You can't undo the object properties changes (like in max' properties dialog), and the properties stay on the object, even if you delete the modifier. Nevertheless it seemed a good idea to put them into the modifier user interface, because I needed these properties very often. Additionally, you can switch vertex ticks on or off.
- Vtx: Switches Vertex ticks on, off or default (depending on subobject selection)
- SeeThr: Object property "See Through"
- VCol: Object Property
"Vertex Color"
This checkbox always refers to the vertex color channel you have selected in the Vertex rollout, the Face rollout or the Vertex Paint tool. - EdgO: Object Property "Edges Only"
In the next row you see the buttons for the subobject modes. You should be familiar with the subobject modes Vertices, Edges, Faces, Polygons and Elements by Edit Mesh. There are two additional Subobject modes: UVFaces and UVPolys. These deal with the UV coordinates and material IDs of faces and polygons and will be described in their rollout description.
If you click on the subobject buttons with shift, you can load the clicked subobject selection into the current subobject selection. This means, if you are e.g. in vertex subobject mode, and click with shift onto faces, all vertices, which lie on selected faces, will be selected. Additionally, the shift click feature expands to polys or elements, if you click on these subobject buttons.
In the next two rows you see various buttons dealing with subobject selection.
- |: Select all subobjects
in the center of the pivot on the x axis
- <: Select all subobjects left of
the center of the pivot on the x axis
- >: Select all subobjects right of
the center of the pivot on the x axis
- X: Select all subobjects, which have the same x position as the currently selected subobjects
- Y: Select all subobjects, which have the same y position as the currently selected subobjects
- Z: Select all subobjects, which have
the same z position as the currently selected subobjects
- +: Grow the current subobject selection. Similar to Editable Poly.
- -: Shrink the current subobject
selection. Similar to Editable Poly.
- Op: Select all "open" subobjects
(subobjects, which are on a border, like "Select open Edges" in Edit
Mesh). Unlike Edit Mesh, this not only available for edges, but also
for all other subobjects.
- S: Save the current selection
- L: Load a selection
- M: Merge a selection
- Rng: Expands an edge selection by selecting all edges parallel to the selected edges. Similar to Editable Poly "Ring".
- Lop: Expands the selection as far as possible, in alignment with selected edges. Similar to Editable Poly "Loop".
- Rnd: Opens the Random Subobject Selection Dialog, or continues a selection sequence.
- Exp: Explode into objects.
This button behaves regarding the set subobject mode: In "Object", it splits the mesh by angle. In "Faces", "Poly" and "Element" it splits by faces, polys or elements (selected only, angle is ignored). In "UVFaces" and "UVPoly" it splits by Material ID (selected only). - Hid: Hides the current
subobject selection. Similar to Edit Mesh.
- UnhAll: Unhides all hidden subobjects. Similar to Edit Mesh.
Some of the buttons have a "hidden feature": You can vary the type of selection by max' default selection function keys: "Ctrl" adds the selection to the current selection, "Shift" alters the selection (XOR), and "Alt" removes the selection from the current selection. This works for |,<,>,Open and Rnd.
"Ring" and "Loop" work exactly the same way they work in Editable Poly; the same restrictions appear, and like in Editable Poly, only visible edges can be worked with this.
"X","Y" and "Z" behave a bit strange in edges mode. If you expand a selection perpendicular to an edge (e.g. the edge is parallel to the x axis and you expand to y), the perpendicular edges on the border of the original edge are selected too. This is not a bug, since the perpendicular edges really belong to the selection! They are clearly inside the area to be selected and thus there's no way not to select them. Nevertheless this behaviour might be unwanted. So think about using "Ring" and "Loop" for edges instead, where other restrictions appear ;-)
|,<,>,X,Y and Z currently only work in the local space of the object. It is planned to extend this to the other reference coordinate systems in the future.
Important:
There's a special thing to notice concerning the |,< and > buttons: To select the subobjects left, right and in the center of an object, you first have to exactly define what IS the center. Ok, it's the pivot. But if we just would look if a point has the exactly same x position as the pivot, we would find very few points. Even a newly created object has some inaccuracies in its vertices, which means that the vertices vary in their position. This variation is ridiculously small (4 digits after comma), but it has to be taken into account. So you can set the accuracy yourself in the settings dialog, to tell the program, what you want it to regard as "the center". The default precision is 0.001.
In the last row you find three other buttons and a status display:
- IgnBf: Ignore Backfacing. Similar to edit mesh.
 : Puts up the Settings dialog
- ?: Puts up this help
- On the right hand, there is a status display, which or how many
subobjects are currently selected. Similar to Edit Mesh.