Sculpt Tool
Being one of the major reasons to implement the painting tools, sculpt
is also the most advanced tool of the current paint tools. Sculpt, AKA
deform paint, is a tool, with which you can deform geometry by brush
strokes. Reference coordinate systems are supported, and you can paint
by normals. This makes it to a very powerful modeling tool.
Size, feather and depth are supported for stylus.
This tool is also available as a standalone modifier named "Sculpt".
Additionally, you can smoothen with this tool.
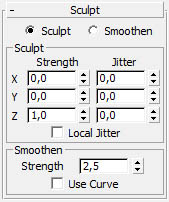
- Sculpt/Smoothen: here
you select if you want to use the sculpt or smoothen feature. This has
been but into a single tool panel to allow a fast switching between
sculpting and smoothing, as often required. If you hold the shift key
while painting, you can quickly switch between sculpting and smoothing
and vice versa.
- Sculpt options:
- Strength X/Y/Z: The strength in world units, with which
you deform your mesh. X,Y and Z are always using the reference
coordinate systems. So they have different meanings in the different
coordinate systems:
- View: in the front view Z points upwards, x right, y
backwards. If you set Z eg. to 1.0 m, you will deform all painted
points 1.0 m upwards. This is the preferred mode for sculpting
landscapes, where you sculpt hills and valleys just up and downwards.
- Screen: Z points always backwards from the screen, X
right, Y upwards. If you set Z e.g. to 1.0 m, you will deform all
painted points 1.0 m towards your view point. This is the preferred
mode for making elevations and deepenings into an object.
- World: Like view.
- Parent: X,Y and Z are set according to the objects own
coordinate system. This is a difference to the standard max coordinate
systems, where this coordinate system would mean the parent of this
object. But since you move vertices, the object itself would be the
parent of the vertices. In fact, painting in object mode is exactly the
same as painting in vertex subobject mode - with the only difference,
that you are not disturbed by vertex ticks when painting in object
mode.
- Local: Z points along the normal of the
vertex/face/polygon. This may be either the real normal, or a line from
the pivot point through the vertex/face/polygon (see parameter "Norm/by
Pivot). This is the preferred mode for modeling.
- Grid: X,Y, and Z are set by grid.
- Pick: Pick a reference coordinate system from a
different object.
IMPORTANT!!
One of the major reasons for getting unwanted results is not using X,Y
and Z correctly. In most cases, you should use only Z, because this is
the direction, which is based on the coordinate system. X and Y are
only available for special purposes, e.g. if you want to paint skewed
hills. So if your'e beginning to play with the toy, use only Z. Using
X,Y and Z without exactly knowing what their'e doing, may lead to
strange results.
- Jitter X/Y/Z: In addition to the basic deform
directions,
you may put a random jitter on each of the directions.
- Local Jitter: This sets, how the jitter is added to the
deformation: If switched off, all vertices, which are in the current
brush stroke, get the same jitter. If switched on, each vertex gets
it's own random jitter.
- Smoothing Options:
- Strength: This sets the
strength of the smoothing
- Use Curve: This sets,
if the paint falloff curve is used for the
smoothing.